I apologize to the two or three people who read this blog for my absence during the winter. I'm back at it, and will be putting up new posts this week. Lots going on, new camera (I told you so) for Christmas, and the winter blues are behind us. It's time to sweat and make shavings!
Oh, and I fixed the wax-in-the-dog-hole problem: rosin. I had a big tub of finely ground rosin I was using to try to mix up a batch of varnish. The rosin and varnish were failures, but it makes the best holdfast griptionizer you ever saw.
Thanks for reading. Drop me a comment.
Wednesday, March 2, 2011

Saturday, November 6, 2010
New Peter Ross Hold Fasts
Great day in the morning but these are nice.

Brand new hand forged hold fasts (and is that one word or two?) from master blacksmith Peter Ross, late of Colonial Williamsburg and acknowledged as one of America's great artisans. If you want to see iron work that will make your jaw drop, drop by his website:
There are several more or less successful attempts at a factory made holdfast on the market. There is even a typically over-engineered one that uses a threaded screw to provide downward pressure, so it's really more of a benchtop downward acting vise than anything. Some of the true friction-action holdfasts have a bad reputation for fracturing under repeated use - that will never happen with these beauties. You hold them in your hand and you just know that 150 years from now they'll be on somebody's bench - maybe a great great grandson or daughter if you're lucky and raise 'em right.

Of course you know how they work. There is a 3/4" hole drilled in the bench top, or in the skirt boards, and into it you drop the holdfast. Whack it down with a couple of mallet blows, and friction works its magic. To release, just whack the back, behind the bend, and it's free. Simplicity itself. Needs no lubrication. Y2K compliant.

In the skirt board, they provide amazing holding power. One end of the board in the vise or under the planing hook and the other under a holdfast and you're good for all the planing you'd ever need to do. When finished, whack it and you're outa there.
They cost a good bit more than the rinky dink factory jobs, but there comes a time in a person's life when they've had enough of rinky dink and want to have something solid and beautiful and basically perfect in their kit, something that will last 200 years of daily use, for the price of a couple of dinners out.
Peter's standard model is made for a 7/8" hole - I got the 3/4" by request because I already had the holes drilled for the small Jorgensen bench stops discussed earlier. Even scaled down slightly, they are massive and I can't imagine any need for a larger model unless you're holding down really massive work pieces.
To my chagrin, I waxed some of the holes to make the bench stops easier to turn and to insert and remove, and now they are completely useless for holdfast use and will not grip, no matter what. So let that be a lesson to you - don't wax your bench holes if you want to use these puppies or you'll be sad.
And to all those of you facing an onslaught of post modernist, over engineered frippery in the workshop, I have two words of advice for you, courtesy of Patrick O'Brian:

Tuesday, October 19, 2010
The Greatest Album in the World

Not words to bandy about lightly, I know. But if I could only grab one album of music to take on the last spaceship leaving Earth, I think I would get this one. Plenty of other people will bring "Hotel California" and I'm sure there will be plenty of Beethoven and Grateful Dead to keep us satisfied on our multi-year trip to Alpha Centauri. But there might not be anything like this, or certainly anything as good as this, and that would be, as the saying goes, a crying shame.
I try to keep fluff to a minimum on this blog, but we must digress occasionally. A little poetry and music never hurt anyone and you do better work if you have tunes to listen to while you're pushing a file.
"High Atmosphere", a compilation of recordings made in the Appalachian mountains in 1965 by John Cohen, was originally released in 1975. What's a nice Jewish boy doing in the mountains of Virginia and North Carolina? Snagging the finest authentic mountain music ever recorded, that's what. There are lots of other albums of original music out there, some of them splendid, some of them merely amusing, some pretty forgettable. As with rifles and houses and furniture, just because it's old doesn't mean it's good. But this music is good. No, it's great. And I mean great in the Julius Caesar sense of the word. Thanks to Cohen, this music will live forever. It was re-released in 1995, apparently with new material added, although I haven't compared the song list to my original vinyl LP to see what's been added. (The pre-1995 CD did not have all the songs from the LP - I believe two were missing. Be sure and get the 1995 re-release.)
If you have no prior experience with original recordings of Appalachian music, you are missing out. Even if you don't wind up liking it, you should acquaint yourself briefly with it and keep some on hand in case you need a look into the past, (or you have some really cool friends over for moonshine and barefoot wrestling.) This music is unaffected, raw, honest, unapologetic, spontaneous, joyous, and dreadfully sad. Some of it is absolutely chilling. Lloyd Chandler's "Remember and Do Pray For Me" will lift the hair off your head, as does his "A Conversation With Death." Wade Ward's "Shady Grove" may be the finest version of this classic tune ever recorded. Dellie Norton's two wonderful (possibly Elizabethan) ballads are sung in a voice that cannot be described easily in words.
There is a lot more of this music out there. The magnificent "Mountain Music of Kentucky" is almost as good, and is more wide reaching in styles represented. Bascom Lamar Lunsford's "Ballads, Banjo Tunes and Sacred Songs of North Carolina" is exceptional and shows one man's ability to both fully appreciate this music as well as authentically create it himself. Tommy Jarrell's albums are seminal fiddle recordings. Roscoe Holcombe is the Bob Dylan and Robert Johnson of this music rolled into one. But there is no collection of Appalachian music that will wither you where you stand quite as effectively as "High Atmosphere."
Available on Rounder Records as well as Amazon.com and Emusic.com. Incidentally, if you're into this stuff, a subscription to Emusic.com will give you access to vast quantities of original recordings of Appalachian, early country, and blues, back before the suits got ahold of our ancestors' music and made it into the flavorless paste that it is now.
Helpful links, no extra charge:


Monday, October 11, 2010
Rifle carving
A quick photo from last week showing the ground work done on my rifle. Backgrounds taken down and smoothed. The next step is modelling the carving, or putting in the three dimensional detail, although this pattern is pretty simple and in keeping with the spirit of the rifles on which it is based.

The rifle now, at present, is carved and has it's asphaltum stain on, and the first coat of oil. Will add photos soon. The asphaltum was a success, but very very BROWN. No reddish cast at all, so I augmented with a little red stained oil. Very nice so far.

The rifle now, at present, is carved and has it's asphaltum stain on, and the first coat of oil. Will add photos soon. The asphaltum was a success, but very very BROWN. No reddish cast at all, so I augmented with a little red stained oil. Very nice so far.
Friday, October 1, 2010
Going down the rabbit hole
Well, it's begun - I'm going to build a rifling bench. I got two blank rifling worms from Steve Bookout several years ago and one night the bench top was cleaned off so I thought I'd go ahead and throw a pencil line on one of them. For the uninitiated, this is a long wooden pole with a series of slow spiral grooves on it that, when attached to an iron rod with a cutter on the end, will cut similar spiral grooves on the inside of a barrel, thus making it a rifle barrel.
Rifling grooves are described in their "twist rate", which is usually termed something like "one turn in 48" which mean that the spiral grooves will make one complete turn (from 12 oclock back around to 12 oclock again) in 48" of length on the pole. This is an insanely slow rate of twist compared to modern rifle barrels which are often one turn in 12 or even 10 inches to stabilize long, pointed modern bullets travelling at very high speeds. But a round lead ball is a leisurely, gentleman's tool, and need only spin at a sedate pace to achieve stability and accuracy. My rifler, the first one, will be one turn in 56", for larger size barrels, from about .45 caliber and up. I'll make a one in 48" for smaller than .45 caliber, as it's traditional that a slightly faster twist rate helps stabilize smaller caliber balls.
How does the tape get on there?


Rifling grooves are described in their "twist rate", which is usually termed something like "one turn in 48" which mean that the spiral grooves will make one complete turn (from 12 oclock back around to 12 oclock again) in 48" of length on the pole. This is an insanely slow rate of twist compared to modern rifle barrels which are often one turn in 12 or even 10 inches to stabilize long, pointed modern bullets travelling at very high speeds. But a round lead ball is a leisurely, gentleman's tool, and need only spin at a sedate pace to achieve stability and accuracy. My rifler, the first one, will be one turn in 56", for larger size barrels, from about .45 caliber and up. I'll make a one in 48" for smaller than .45 caliber, as it's traditional that a slightly faster twist rate helps stabilize smaller caliber balls.

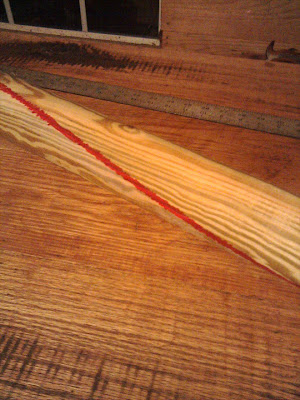
Here you can see the rough idea - this is the round rifling "worm" with a red line snaking slowly around it at a rate of one turn in 56". If you look just beneath the red line you'll notice a pale whitish area - this is actually a piece of scotch tape that wraps around the worm. I scribbled red Sharpie over one edge of the tape, making a crisp accurate line when the tape is pulled of.
How does the tape get on there?
You lay the angle out as a right triangle. The base of the triangle is the length of the diameter of the rifler (in this case 9") the other leg of the right angle is the maximum length of one turn (here, it's 56") and the hypotenuse between those two points describes the angle that will become the spiral groove, and is where you lay your tape down, carefully, upside down. You can use other things - heavy wire would work too - and you roll (carefully) the rifler over this material to transfer it onto the rifler in a spiral pattern. The rifler stays at all times parallel to the leg of the triangle that is 56" long, not the hypotenuse.

You get a rough idea - the small square is representing the 9" leg and the long straight edge is used to lay out 56", only it was laid out on the edge of the bench. The hypotenuse just joins the two together. The tricky part is getting scotch tape to lay down and behave, and then rolling the rifler carefully back across the upside down tape so that it's transferred. Sight down the tape the full length and look for fairness - no odd bumps or curves - that will mis-guide the rifling cutter (to which this attaches, remember) as it cuts grooves in the barrel.
The beginning chisel cut made carefully down the length of the sharp edge of the red mark.

Use a 1" chisel and try to keep it honest the whole length. Subsequent grooves are marked out with a divider and likewise cut.

There are photographs of some of this work being done in the Smoky Mountains in the 1920's. The photos aren't particularly believable - they're set pieces staged for the purpose by photographers during the period when the park was being instituted and many families were being encouraged to find homes elsewhere - sorta like what happened with the Cherokee I suppose. The photos show an elderly woman wrapping a hickory split around the worm (which would actually give you a pretty fair curve if the split was straight and smooth) and then carving the groove with a pocket knife, which (if you carved 7 grooves) would be my idea of hell on earth.


She's obviously been splitting a good deal of hickory bottoming chairs - nice straight piece laying in the foreground would make several good wiping sticks (ramrods). But I really don't think she carved all those grooves with a Barlow knife. I believe these photos were taken outside to provide better light and more interesting backgrounds. (Much of the photography of the Smokies was done by WPA photographers working during the Depression, and they already show a society collapsing under the weight of modernity. We all grumble about the government forcing people off their farms, but truth be told, if the land hadn't become a park it would have all been sold to lumber companies and would today be malls and subdivisions.)

Here you see three rifling machine setups - the one on the left looks to be broken and taken out for the photograph only. Notice how the two on the left use actual rifle barrels as the rifling "worm" - this is another way to do it - use a barrel to rifle a barrel. But it's more time consuming to do it this way, and you have to pour a lead slug to ride in the guide barrel, which wears out...the wooden rifling rod on the right is probably better. It's certainly the technology that was brought from European professional shops to the colonies. The two machines on the right appear to be complete and functional.

Here it is in actual use. I think the man in the photo is the investigator who wrote the article - he doesn't look like a mountaineer. Looks like city people. But here you see the rifling machine on one end of the long plank "bench", and the barrel being rifled on the right. Pretty self explanatory. Very elegant solution to the problem.
Trivia: what two tools were unique to the gunsmithing trade, that were not shared by any other trade? One was the rifling machine and the other was the "pan drill" or the device that cut the shallow groove in the flintlock pan.
A very nice dissertation on the longrifle culture on the Smoky Mountains is maintained by the National Park Service, originally published in 1941. Many other photos.
Monday, September 27, 2010
To continue...


This rifle has the traditional 8 pointed star on the cheekpiece - lovely and ubiquitous. Well, it can be lovely - it can be badly done too. This one is a nice piece - a copy of the original. Pretty straightforward inlay work. The small acute angles in between the points are of course the thing you look at for quality work. Have they been chipped off and reglued? Or are they all in perfect place, denoting nice, slow, poorly paid work? I didn't chip this inlet, if I remember correctly. I used sheet silver (pure) instead of the probably more historically correct coin silver, which would have been the typical gunsmith's raw material for most silver inlays. Coin silver is slightly more yellowish in color, and you learn to look for this.

Looks naxty! (with an x) Lamp black all over the place, hasn't been filed and sanded down yet.

As if the other view wasn't awful enough. There's a certain charming honesty about this really nice, delicate inlay being held into the stock with a big wood screw. He didn't try to hide his tracks - he just screwed it down. I love it. No pretensions.

The vent pick inlay. It houses (until you lose it in the leaves) a small metal pick to keep the touch hole open. This rifle is about 1810-20, I believe, and we can see inlays creeping all over the stock, replacing the once common relief carving. This is an exceptional rifle - it has both wonderful carving and great inlays, but on most of his competition there would have been thin, weak, vestigial carving and more and more inlays, some of them tasteless and graceless. The old ways and skills, like the old smiths, were dying off. Tastes were changing. Even if you bought an expensive piece of furniture, it wouldn't be carved, it would have probably been inlaid with veneer and marquetry. Things fall apart - the center cannot hold...

Still not too shabby. He knew his way around a rifle stock, that's for sure. I sort of lied - the long east/west points on both the star and the vent pick inlay (which, on this gun, does not actually hold a vent pick - it just takes the place where carving used to be done) are held in place by small silver nails. I didn't try to hide them too well because they're obvious on the original. Once engraved, these guys will really whistle Yankee Doodle.
Wednesday, September 22, 2010
Castings

Taking a break to show the before and after. This trigger guard is cast off a wooden master I carved myself because there was nothing available that was suitable. Castings get smaller and less sophisticated through time it seems - the inevitable result of multiple generations being distanced from their sources which are usually someone's trigger guard they took off their antique rifle back in the 70's and cast copies of it, often for sale through Dixie Gun Works which was about the only game in town for a generation.
Sand castings are cheap and readily available but they're hella work. As is evident. Investment casting cost usually at least twice as much but it's a much bigger and more expensive project to get a custom investment casting made. These were cast at a local sand casting foundry in Chattanooga for just a little more than stuff normally costs through the catalogs. But I can take them almost anything and they can have ten of them ready in a few days. I get lots of stuff cast there and making my own masters has really changed how I work.

Here is the master (embedded in a mold board) with two castings of a trigger guard I did based on the Brass Barreled Rifle, which is just a stunning trigger guard. It's a whopper though, and takes almost an entire working day to bring it from the rough casting to a finished piece ready for mounting.

The guard on the left you saw earlier. It's taken from the John Sheetz of Staunton rifle and required a lot of work to get right. The bow has to be very wide, and all the angles and details are just great. It's quite versatile though, and with minimal filing can be used on a huge number of guns. Also visible are two types of sideplates, which I also carved out and had cast. They look and feel very different from sideplates cut out of sheet. I've done it both ways and won't go back to sheet if I can help it.
I intend to set up for home casting in a year or so. It's a job of work, and dangerous too, but an integral part of the trade and one which (like forging or lock making) must be kept alive in home shops if it's to survive as part of the trade. The more we buy from catalogs the less we make, the less we learn, the less we can pass on. The trade doesn't belong to us - we just borrow it from our grandkids. Just like the rifles.
Subscribe to:
Posts (Atom)