Rifling grooves are described in their "twist rate", which is usually termed something like "one turn in 48" which mean that the spiral grooves will make one complete turn (from 12 oclock back around to 12 oclock again) in 48" of length on the pole. This is an insanely slow rate of twist compared to modern rifle barrels which are often one turn in 12 or even 10 inches to stabilize long, pointed modern bullets travelling at very high speeds. But a round lead ball is a leisurely, gentleman's tool, and need only spin at a sedate pace to achieve stability and accuracy. My rifler, the first one, will be one turn in 56", for larger size barrels, from about .45 caliber and up. I'll make a one in 48" for smaller than .45 caliber, as it's traditional that a slightly faster twist rate helps stabilize smaller caliber balls.
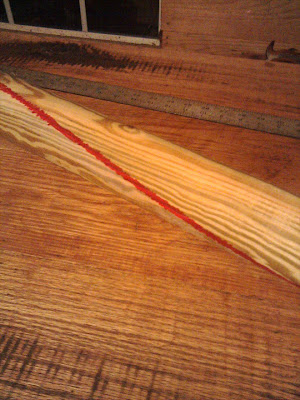
Here you can see the rough idea - this is the round rifling "worm" with a red line snaking slowly around it at a rate of one turn in 56". If you look just beneath the red line you'll notice a pale whitish area - this is actually a piece of scotch tape that wraps around the worm. I scribbled red Sharpie over one edge of the tape, making a crisp accurate line when the tape is pulled of.
How does the tape get on there?
You lay the angle out as a right triangle. The base of the triangle is the length of the diameter of the rifler (in this case 9") the other leg of the right angle is the maximum length of one turn (here, it's 56") and the hypotenuse between those two points describes the angle that will become the spiral groove, and is where you lay your tape down, carefully, upside down. You can use other things - heavy wire would work too - and you roll (carefully) the rifler over this material to transfer it onto the rifler in a spiral pattern. The rifler stays at all times parallel to the leg of the triangle that is 56" long, not the hypotenuse.
You get a rough idea - the small square is representing the 9" leg and the long straight edge is used to lay out 56", only it was laid out on the edge of the bench. The hypotenuse just joins the two together. The tricky part is getting scotch tape to lay down and behave, and then rolling the rifler carefully back across the upside down tape so that it's transferred. Sight down the tape the full length and look for fairness - no odd bumps or curves - that will mis-guide the rifling cutter (to which this attaches, remember) as it cuts grooves in the barrel.
The beginning chisel cut made carefully down the length of the sharp edge of the red mark.
Use a 1" chisel and try to keep it honest the whole length. Subsequent grooves are marked out with a divider and likewise cut.
There are photographs of some of this work being done in the Smoky Mountains in the 1920's. The photos aren't particularly believable - they're set pieces staged for the purpose by photographers during the period when the park was being instituted and many families were being encouraged to find homes elsewhere - sorta like what happened with the Cherokee I suppose. The photos show an elderly woman wrapping a hickory split around the worm (which would actually give you a pretty fair curve if the split was straight and smooth) and then carving the groove with a pocket knife, which (if you carved 7 grooves) would be my idea of hell on earth.
She's obviously been splitting a good deal of hickory bottoming chairs - nice straight piece laying in the foreground would make several good wiping sticks (ramrods). But I really don't think she carved all those grooves with a Barlow knife. I believe these photos were taken outside to provide better light and more interesting backgrounds. (Much of the photography of the Smokies was done by WPA photographers working during the Depression, and they already show a society collapsing under the weight of modernity. We all grumble about the government forcing people off their farms, but truth be told, if the land hadn't become a park it would have all been sold to lumber companies and would today be malls and subdivisions.)
Here you see three rifling machine setups - the one on the left looks to be broken and taken out for the photograph only. Notice how the two on the left use actual rifle barrels as the rifling "worm" - this is another way to do it - use a barrel to rifle a barrel. But it's more time consuming to do it this way, and you have to pour a lead slug to ride in the guide barrel, which wears out...the wooden rifling rod on the right is probably better. It's certainly the technology that was brought from European professional shops to the colonies. The two machines on the right appear to be complete and functional.
Here it is in actual use. I think the man in the photo is the investigator who wrote the article - he doesn't look like a mountaineer. Looks like city people. But here you see the rifling machine on one end of the long plank "bench", and the barrel being rifled on the right. Pretty self explanatory. Very elegant solution to the problem.
Trivia: what two tools were unique to the gunsmithing trade, that were not shared by any other trade? One was the rifling machine and the other was the "pan drill" or the device that cut the shallow groove in the flintlock pan.
A very nice dissertation on the longrifle culture on the Smoky Mountains is maintained by the National Park Service, originally published in 1941. Many other photos.


No comments:
Post a Comment